Tuesday, October 2, 2012

Tapioca Pudding=Summertime


How simple.  How sweet.  How retro. How perfectly wonderful for any night of the year, but for me...
Tapioca Pudding=Summertime.  I have memories of making this with my mom.  On summer nights when we wanted something delicious without heating the house up with the oven, we turned to our old friend, Tapioca.  Now, tapioca is underrated, in my opinion.  It hides in the back of the pantry, waiting for someone to whip it up.  I always have some on hand because I also use it for my pies as a thickener.  I love the way it puffs up and the tiny little pearls sparkle in the pie. But, as a pudding its versatile and creamy and usually served chilled.  
Well, when mom and I made it, it rarely made it to the fridge.  I remember after my mom took it off the stove, poured it into her large pyrex mixing bowl and sprinkled it with cinnamon, she would grab two big spoons from the drawer and her and I would dig in.  It was so hot that we often burned our tongues and giggled as we fanned our mouths (as if that would help).  And even if the night was hot, it didn't matter because we just could not wait.  
I make this for my family now. Grayson prefers his cold, with cinnamon and whip cream on top...so decadent, right? And Emerson likes hers cold, without cinnamon or whip cream.  I like it any way I can get it. 


I love how easy this is to make.  I follow the regular Tapioca recipe on the back of the box.  I use 1% milk, sugar, eggs, and vanilla.  The only thing I do different is I add a half of a TBSP more of tapioca (I like my pudding a little thicker) So the measurement on the recipe calls for 3 TBSP so I do 3 1/2 TBSP.  I patiently stand over the stove, stirring with my whisk, watching the pudding thicken up.  Then I spoon it into individual mismatched vintage dishes (because I think everything tastes better in a special dish), sprinkle half of them with cinnamon, and stick them in the fridge to cool.  
P.S.  mine never makes it to the fridge...my mouth is burned, but my tummy is happy.

Until we meet again, 
Lo


Monday, August 20, 2012

One day at a time...


"One day at a time...this is enough.  Do not look back and grieve over the past, for it is gone; and do not be troubled about the future, for it is not yet come.  Live in the present, and make it so beautiful that it will be worth remembering..." 
~Ida Scott Taylor


Here we are, facing the last full week of summer here at the Paul home and I...am...sad!  I have had a great time with both of my kids all summer long having no concrete plans, just wakin' up and deciding what the adventure would be for the day. 
So as school approaches quickly, I thought I should get a head start on organizing our time.  We juggle 4 schedules each day, and each day I feel a bit overwhelmed with trying to remember who is doing what and where. 
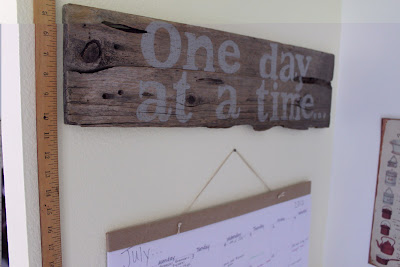
I headed out in search for a large enough calendar to fit our life. I had a vision in my mind of what I wanted the calendar to look like and soon after my search began, I realized that the only way I'd have what I really needed would be to make it myself.  I found this desk top pad of paper at the office supply store, brought it home and started measuring out a box a day.  I used a black pen to mark off the boxes and a gray sharpie for the months, weeks and dates.


The top strip of the pad of paper was black.  I decided to cover the black with natural brown paper. Then I knotted some twine through the holes in the top to hang it on the wall in my kitchen.  


When I was finished, I painted a piece of salvaged barn wood to go above the calendar.  It reads:
'One day at a time...'


The calendar hangs above Emerson's kitchen hutch. I bought 4 different colored fine point sharpies for each person so that visually, I could tell where everyone was on any given day of the month.  I used a vintage aluminum measuring cup to hold the pens.  

One day at a time...

These 5 little words made a difference in our family the moment I hung this sign above the calendar and today, we live it, each day.

Until we meet again, 
Lo


Tuesday, August 7, 2012

The Vintage Green Bathing Suit and Antique Yellow Fire Hydrant...

My mom is my inspiration.  She has taught me the love for tradition and the importance of it in my life.

Growing up, my mom had a green one piece bathing suit. I never saw her wear it because it was set aside in a special trunk and brought out for each of my birthdays.  A picture was taken with me in the green, criss-cross back bathing suit each year from age one to age thirteen. Nana (my mom's mom) had seen the idea in a Time magazine years before I was born and suggested to my mom that she do this if she ever had a daughter.  The original plan that my mom had was for me to pose in this suit each year until my 18th birthday. But as stubborn teenagers go...I began to refuse to get into the bathing suit and pose for pictures.  At times calling it "embarrassing." Thirteen was awkward and I cannot blame my teenage self for that, but I will admit it is one of the very few regrets I have...wishing I had done it for mom.  Knowing now how much it meant to her, as I experience the love I have for my own children. Giving her the gift of rewinding time and watching me grow from a toddler to a young woman. 

When I had Grayson 7 years ago, I knew I wanted to do something similar.  I chose to have him stand next to a 1940's fire hydrant that sits in my parents yard.  Each year in August, he proudly stands next to the yellow fire hydrant, and every year, I cry.  My boy is growing up...


Grayson: One Year Old


Grayson: Two Years Old


Grayson: Three Years Old


Grayson: Four Years Old


Grayson: Five Years Old


Grayson: Six Years Old


Grayson:  7 years old


The green bathing suit has been passed down to me and my daughter, Emerson Beatrice.  Each year in May, she proudly poses in her Meema's green bathing suit, and every year, I cry. My girl is growing up...

Emerson B: One Year Old


Emerson B: Two Years Old


Emerson B: Three Years Old


It is never too late to start a new tradition or put your own style on an old tradition...

Until we meet again...
Lo


Monday, July 16, 2012

Highlights from last week's dinners & fun foodie pics

Now that my sick days are easing up a bit, I can finally start to have some consistency in our weekly meal planning. It still doesn't always flow as planned~ I definitely had some days where i was feeling under the weather. There was breakfast for dinner one night and the go~to pasta with garlic another {not planned}, but overall I did pretty well. 
One thing I have learned that certainly helps me with my meal planning is shopping a couple times throughout the week for produce items, instead of buying all necessary ingredients in the beginning of the week. If I decide to change my mind or don't get to cooking as certain meal, I haven't wasted any food. Although it's not always convenient to shop frequently throughout the week, I find it does save me a ton of $$ and reduces the amount of spoilage and wasted food. We are very lucky to have a local farm with attractions for kids, as well as farmer's markets almost every day of the week in our area, so shopping can be a fun experience and a bit of an adventure. "Staple" items like pasta, meats, rice, etc. I tend to keep on hand and stock up on at Costco or whenever there is a special at the market, and I look for meals when searching for new recipes that center around the staple items I usually have.

~Yummy produce at the farmer's market~
~Anyway~
 I wanted to share 3 fabulous recipes I tried last week, each one was a smash success and I'll definitely be making them again! I found all of them on skinnytaste.com , love that website! A while back a friend had introduced me to it, and these days it's where I find most of my recipes. Now she's all over Pinterest! Check them out, you won't be dissapointed {click each recipe title to be directed to the recipe}

being as though these weren't my recipes I didn't bother taking fancy pics with my camera, all of these I took on Instagram {my new obsession}

I served the shrimp over the cilantro lime rice because J is a HUGE cilantro nut. It may be a bit too much cilantro for some, but we loved it! I served it with two ripe avocados on the side~ sliced and drizzled with lime juice, s&p.


 My changes: I used cherry heirloom tomatoes, pulsed lightly in the food processor and I used linguine instead of angel hair

I served it with a light caprese salad {really the salad was for me, I was dreaming of it all day!} ~ farm fresh tomatoes, fresh mozzarella bought at the farmer's market and basil from our garden, drizzled with olive oil, s&p. so yummy! 

{I'm on a bit of a zucchini kick since they are in season and everywhere!!} 

 ~Sausage Stuffed Zucchini Boats~
 be sure to use BIG zucchinis! As you can see, my stuffing is clearly exploding out of my zucchinis! My changes: I used my quick and easy tomato sauce instead of the one Gina uses. 


more random foodie pics...

Have a fabulous week!
xoxo,
B

Wednesday, July 11, 2012

a simple and light summertime pasta dish

Lately I've been craving angel hair pasta topped with a lightweight, fresh tomato sauce. For my birthday a couple weeks back, we went to Cafe Firenze {a new favorite} and I was beyond thrilled for days to satisfy my craving {as only a big preggo could be}. Imagine how my dear heart broke when, low and behold there was nothing remotely similar on the menu. Our waiter was incredible, however and "created" a dish for me. I loved how the chef kept the cherry tomatoes somewhat whole, allowing you to truly taste the sweetness they offer. 
The other day I had some farm~fresh cherry tomatoes and decided to whip this meal up inspired by the delicious dish I had on my birthday. It's so easy & simple and fresh & light, it really is the perfect pasta dish for summer evenings. In fact, I gobbled it up so well that we've had this dish 3 times since AND J used the leftover sauce on the pizzas he made last night. YUMMO!

~A Simple Rustic Cherry Tomato Sauce over Angel Hair Pasta~
Ingredients
- 2 pounds ripe cherry tomatoes
- extra-virgin olive oil for the pan
- 3 garlic cloves, thinly sliced
- 1 - 1 1/2 tablespoons fresh thyme leaves {the second time I made it added the extra half, VERY yummy!}
- 1 teaspoon Oregano
- Pinch chili flakes {add this after cooking if, like me, you are cooking for a wee little one}
- 1 teaspoon sugar
- 1 pound dried angel hair pasta
- freshly grated Parmesan for the table
- 1/4 cup chiffonade basil, plus whole sprigs for garnish

Directions
1.) Cook pasta according to package directions {be careful not to overcook, angel hair can easily turn in to mush~ not very tasty}
2.) LIGHTLY pulse the cherry tomatoes in the food processor {like, only twice}. You want to break them up a bit but not completely liquefy them. One night I chopped them {the food processor was in the dishwasher} and the sauce turned out dry....not recommended. Pulsing them in the food processor releases the juices.
3.) Heat olive oil in a medium skillet. Add garlic and saute until just fragrant. Add thyme and oregano {and chili flakes if you can} and saute about 2 minutes {right when garlic is slightly golden}. Add tomatoes and their juices and the sugar. Stir well and cook about 15 minutes. 
4.) Add cooked pasta to the sauce and toss to combine. Add Parmesan and basil and serve.


enjoy!
xoxo,
B

Monday, July 9, 2012

Fresh Batch of Chunky Wood Frames Listed in our Shop

Hi friends! I hope you are all having a wonderful Monday.
I'm excited to announce that I just listed a fresh batch of my Chunky Wood Frames!

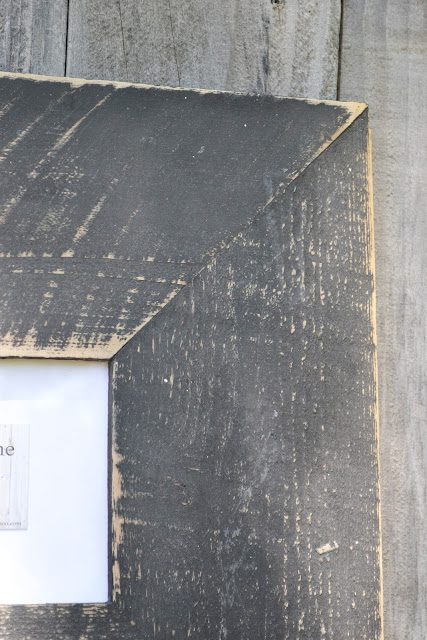
Our frames are a joint project between my husband and I, and are most certainly made with love! I have these hanging all throughout my home and love the impact and statement they make on any wall. They add just the right rustic touch to any room! They look fabulous alone, and spectacular when hung in groups of two or three. The window opening for all frames fit a 5x7 picture.

All frames are made using durable re~purposed fence posts and are reinforced using biscuit~joiners for ultimate durability. Frames come with 2 sawtooth hangers attached so they can be hung horizontally or vertically. All windows come with custom~ cut glass.

Because of the unique characteristic of each piece of fence post, no two frames are alike!
~All frames are $22~

I made a whole bunch in white....


 I also have a bunch in black. They all turned out pretty similar


Finally, I made two in yellow. How perfect are these for a little one's room!!


Click ~here~ to be directed to our shop, or simply click each listing to shop individual listings. 
Happy Shopping!!

xoxo,
B

Sunday, July 8, 2012

New Pillows Listed in Our Shop!

Hi friends! I hope you are all having a wonderful Sunday.
I'm so excited to announce that I have listed tons of new pillows in our shop!

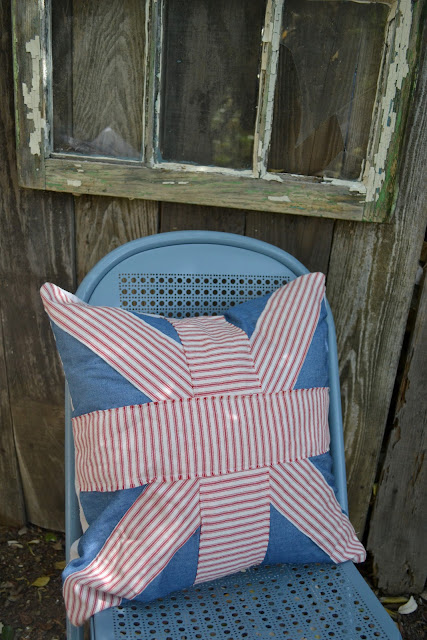
I made a whole batch of Union Jack Pillows. I absolutely love the texture and impact that my Union Jack Pillows add to any living room or bedroom pillow vignette!

I have 2. One that fits an 18" squared pillow {$20}, and one that fits a 16" squared pillow {$18}


made to fit an 18" pillow, $20
made to fit an 18" squared pillow, $20

made to fit an 18" squared pillow, $20

made to fit an 18" squared pillow, $20


made to fit a 16" squared pillow, $18
made to fit a 20" squared pillow, $22

I also made some Swiss Army Red Cross Pillows which are perfect for any style~ industrial, modern, shabby chic or farmhouse. It fits perfectly in any pillow vignette or wherever you want to make a statement in your home. Perfect for the Living Room couch or proudly sitting on any bed.

made to fit an 18" squared pillow, $20

Finally, I made a couple German grain sack pillow covers. They add the perfect historic and rustic touch to any room in your home! One is slightly faded to give it some vintage charm, the other is not.
~German Grain Sack Pillow Covers~
made to fit an 18" squared pillow


~Stay tuned, hopefully tomorrow I'll be able to list my big batch of chunky wood frames that J and I made!~

Click ~here~ to be directed to our shop, or click any pillow names to be directed to the exact listing

Happy Shopping!

xoxo,
B